참조한 강의 : Spring & Hibernate For Beginners (www.udemy.com/course/spring-hibernate-tutorial/)
이전 포스팅에서는 Spring Security 를 설정하는 방법에 대해서 알아보고
아래와 같이 기본으로 제공하는 로그인 화면까지 봤었다.

기본 화면도 그렇게 나쁘진 않은것 같으나,
보통은 웹 사이트별로 자체적인 로그인 화면을 갖고 있는 경우가 많다
그래서 커스텀한 로그인 페이지를 어떻게 만드는지 그리고 로그아웃은 어떻게 하는지 알아본다.
- Modify Spring Security Configuration
: 이전 포스팅에서는 Spring Security 설정 파일인 DemoSecurityConfig.java 에 configure(AuthenticationManagerBuilder) 메소드를 오버라이드 했는데,
이 메소드는 단지 유저에 대한 설정 (유저의 정보를 in-memory 방식으로 하는지 아니면 DB 로 하는지, 그리고 유저이름과 비밀번호, role 은 어떻게 정할지 등) 만 할 수 있고, 로그인, 로그아웃에 대한 url 경로를 지정할 수 가 없다.
그래서 다른 메소드를 오버라이드 해야한다.
configure(HttpSecurity) 라는 메소드를 오버라이드 해야된다.
- DemoSecurityConfig.java
|
@Configuration
@EnableWebSecurity
public class DemoSecurityConfig extends WebSecurityConfigurerAdapter {
@Override
protected void configure(AuthenticationManagerBuilder auth) throws Exception {
// 생략....
}
@Override
protected void configure(HttpSecurity http) throws Exception {
http.authorizeRequests()
.antMatchers("/css/**").permitAll()
.anyRequest().authenticated()
.and()
.formLogin()
.loginPage("/showLoginPage")
.loginProcessingUrl("/authenticateTheUser")
.permitAll();
}
}
|
cs |
위에 쓰인 각각의 함수에 대해 설명하면
authorizeRequests() 는 HttpServletRequest 객체를 통해 request 를 받겠다는 의미이고
antMatchers() 는 url 을 매칭시키기 위해 사용되고, permitAll() 은 모든 유저가 인증 없이 사용가능하다는 의미이다.
anyRequest().authenticated() 는 모든 request 가 항상 인증과정을 거쳐야 한다는 의미가 된다.
(/css/** 경로를 제외한 나머지는 전부 인증을 거쳐야만 사용할 수 있다는 의미가 됨)
formLogin() 은 기본값으로 제공되는 로그인 form 말고 자체적으로 제작한 login form 을 쓰겠다는 의미이며,
loginPage() 는 말그대로 로그인할 페이지 url 이고
loginProcessingUrl() 은 사용자로 부터 입력받은 로그인을 처리할 url 을 의미한다 (POST method 가 처리되는 부분)
그리고 마지막 permitAll() 은 모든 유저가 로그인 화면은 볼 수 있게 한다 라는 의미가 된다.
다음으로 앱 설정 파일인 DemoAppConfig.java 에서 스프링이 css 파일의 경로를 찾을 수 있도록 설정해줘야한다.
그래서 WebMvcConfigurer 라는 인터페이스를 상속 받아서 addResourceHandlers 라는 메소드를 오버라이드 한다
- DemoAppConfig.java
|
@Configuration
@EnableWebMvc
@ComponentScan("com.test.maven")
public class DemoAppConfig implements WebMvcConfigurer {
// 나머지 생략....
@Override
public void addResourceHandlers(ResourceHandlerRegistry registry) {
registry.addResourceHandler("/css/**").addResourceLocations("/css/");
}
}
|
cs |
다음으로 컨트롤러와 jsp 뷰페이지를 만든다
- LoginController.java
|
@Controller
public class LoginController {
@GetMapping("/showLoginPage")
public String showLoginPage() {
return "login";
}
}
|
cs |
- login.jsp
|
<%@ taglib prefix="form" uri="http://www.springframework.org/tags/form" %>
<%@ taglib prefix="c" uri="http://java.sun.com/jsp/jstl/core" %>
<!DOCTYPE html>
<html>
<head>
<title>Login Page</title>
<link rel="stylesheet" type="text/css" href="css/demo.css"/>
</head>
<body>
<h3>Login Page</h3>
<hr>
<form:form action="${pageContext.request.contextPath}/authenticateTheUser" method="POST">
<c:if test="${param.error != null}">
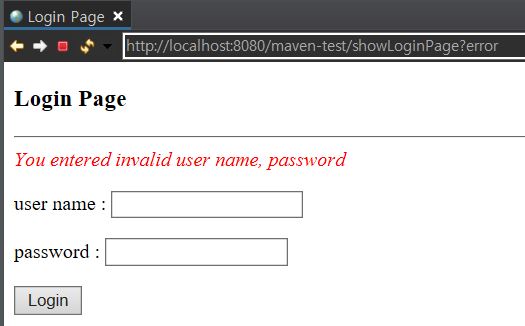
<i class="failed">You entered invalid user name, password</i>
</c:if>
<p>
user name : <input type="text" name="username" />
</p>
<p>
password : <input type="password" name="password" />
</p>
<input type="submit" value="Login" />
</form:form>
</body>
</html>
|
cs |
첫번째 taglib 는 <form:form> 태그를 사용하기 위함이고 (참조 : sdy-study.tistory.com/188)
두번째 taglib 는 <c:if> 태그를 사용하기 위함이다.
로그인시에 에러가 났을때 기본적으로 url 에 error 라는 매개변수가 추가적으로 붙게 되어 있는데,
url 에 error 라는 매개변수가 붙었는지 아닌지에 따라서 로그인을 실패 했는지 성공했는지를 알 수 있다.
그래서 <c:if test="${param.error != null}"> 을 사용했고, 이 태그는 처음엔 안보이다가 로그인이 실패할때만 화면상에 보여지게 된다.
(css 파일은 그냥 색상만 class="failed" 에 색상만 칠해준 간단한거여서 생략함)
이렇게 설정한 후 실행해 보면 다음과 같이 나타난다.


여기까지 custom login form 을 만드는 방법은 알아봤지만,
스타일이 너무 구리다.
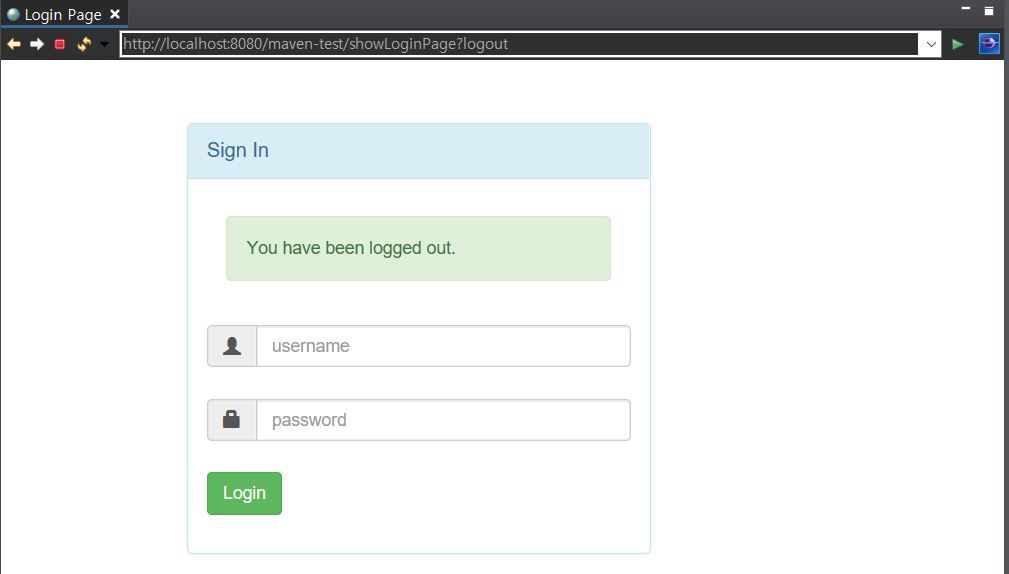
그래서 부트스트랩을 적용시킨 jsp 페이지로 개선시키면 아래와 같이 변한다
(포스팅의 초점이 부트스트랩이 아니므로 부트스트랩에 대한 내용은 생략함)
- login.jsp
|
<%@ taglib prefix="form" uri="http://www.springframework.org/tags/form" %>
<%@ taglib prefix="c" uri="http://java.sun.com/jsp/jstl/core" %>
<!doctype html>
<html lang="en">
<head>
<title>Login Page</title>
<meta charset="utf-8">
<meta name="viewport" content="width=device-width, initial-scale=1, shrink-to-fit=no">
<!-- Reference Bootstrap files -->
<link rel="stylesheet"
href="https://maxcdn.bootstrapcdn.com/bootstrap/3.3.7/css/bootstrap.min.css">
<script src="https://ajax.googleapis.com/ajax/libs/jquery/3.2.0/jquery.min.js"></script>
<script src="https://maxcdn.bootstrapcdn.com/bootstrap/3.3.7/js/bootstrap.min.js"></script>
</head>
<body>
<div>
<div id="loginbox" style="margin-top: 50px;"
class="mainbox col-md-3 col-md-offset-2 col-sm-6 col-sm-offset-2">
<div class="panel panel-info">
<div class="panel-heading">
<div class="panel-title">Sign In</div>
</div>
<div style="padding-top: 30px" class="panel-body">
<!-- Login Form -->
<form:form action="${pageContext.request.contextPath}/authenticateTheUser" method="POST" class="form-horizontal">
<!-- Place for messages: error, alert etc ... -->
<div class="form-group">
<div class="col-xs-15">
<div>
<!-- Check for login error -->
<c:if test="${param.error != null}">
<div class="alert alert-danger col-xs-offset-1 col-xs-10">
Invalid username and password.
</div>
</c:if>
<c:if test="${param.logout != null}">
<div class="alert alert-success col-xs-offset-1 col-xs-10">
You have been logged out.
</div>
</c:if>
</div>
</div>
</div>
<!-- User name -->
<div style="margin-bottom: 25px" class="input-group">
<span class="input-group-addon"><i class="glyphicon glyphicon-user"></i></span>
<input type="text" name="username" placeholder="username" class="form-control">
</div>
<!-- Password -->
<div style="margin-bottom: 25px" class="input-group">
<span class="input-group-addon"><i class="glyphicon glyphicon-lock"></i></span>
<input type="password" name="password" placeholder="password" class="form-control" >
</div>
<!-- Login/Submit Button -->
<div style="margin-top: 10px" class="form-group">
<div class="col-sm-6 controls">
<button type="submit" class="btn btn-success">Login</button>
</div>
</div>
</form:form>
</div>
</div>
</div>
</div>
</body>
</html>
|
cs |

다음으로 로그아웃을 만드는 방법에 대해 알아보자
먼저 Spring Security Configuration 파일에 logout 을 모든 유저에게 허용하도록 설정해야 한다
- DemoSecurityConfig.java
|
@Configuration
@EnableWebSecurity
public class DemoSecurityConfig extends WebSecurityConfigurerAdapter {
@Override
protected void configure(AuthenticationManagerBuilder auth) throws Exception {
// 생략..
}
@Override
protected void configure(HttpSecurity http) throws Exception {
http.authorizeRequests()
.antMatchers("/css/**").permitAll()
.anyRequest().authenticated()
.and()
.formLogin()
.loginPage("/showLoginPage")
.loginProcessingUrl("/authenticateTheUser")
.permitAll()
.and()
.logout().permitAll();
}
}
|
cs |
위에서 보다 싶이 logout().permitAll() 을 추가해줘야한다
로그인할때, 입력을 잘못해서 url 에 error 매개변수가 붙듯이, 로그아웃을 하면, url 에 logout 이라는 매개변수가 붙게 된다.
그래서 이 매개변수를 스프링이 인식할 수 있도록 jsp 부분에 대해서 수정을 해줘야한다.
- index.jsp
|
<%@ taglib prefix="form" uri="http://www.springframework.org/tags/form" %>
<!DOCTYPE html>
<html>
<head>
<title>Home Page</title>
</head>
<body>
<h2>Hello World!</h2>
<hr>
<form:form action="${pageContext.request.contextPath}/logout" method="POST">
<input type="submit" value="Logout" />
</form:form>
</body>
</html>
|
cs |
홈페이지 부분에 <form:form> 태그를 추가해서 /logout 에 대한 처리를 할 수 있게 경로를 연결해줬다.
유저가 로그아웃 버튼을 누르면, logout 매개변수가 url 에 붙어서 spring security filter 로 넘어가게 되고,
여러가지 filter 들 중 에서 LogoutFilter 가 로그아웃에 대한 로직을 수행해준다.
그래서 별도의 자바 코드로 설정할 필요가 없다
그리고 위에 bootstrap 을 적용시킨 index.jsp 에서 설명안하고 하나 넘어간게 있는데
|
<!-- 태그 생략 -->
<!doctype html>
<html lang="en">
<head>
<!-- 생략.. -->
</head>
<body>
<!-- 나머지 생략 ...-->
<c:if test="${param.logout != null}">
<div class="alert alert-success col-xs-offset-1 col-xs-10">
You have been logged out.
</div>
</c:if>
<!-- 나머지 생략 ...-->
</body>
</html>
|
cs |
<c:if test="${param.logout != null}"> 부분이다.
여기도 error 부분이랑 똑같이 생각하면 된다
url 의 매개변수에 logout 이 붙었다면 저 태그를 보여주고 아니면 화면에 안보여주는 식이다.
그래서 로그아웃을 직접 해보면 아래 같이 나오게 된다.

다음 포스팅은 CSRF 에 대해서 알아본다.
'Spring' 카테고리의 다른 글
| Spring Security - User Roles (0) | 2021.03.06 |
|---|---|
| Spring Security - CSRF (Cross Site Request Forgery) (0) | 2021.03.06 |
| Spring Security - Configuration (0) | 2021.03.05 |
| Spring Security - Overview (0) | 2021.03.04 |
| Maven 이란 (0) | 2021.02.25 |